一个操作系统分为内核态和用户态,内核态一般就是os内核,像linux kernel,而用户态则需要在内核的基础上进行封装,提供多租户需要的功能,ubuntu,centos都是linux的发行版。
也就是在linux kernel的基础上,实现了用户态,最近在看linux kernel,所以在qemu下编译了一个linux内核,进行运行。
编译内核
$  mkdir build
$   wget https://cdn.kernel.org/pub/linux/kernel/v3.x/linux-3.10.104.tar.xz
$   tar xvf linux-3.10.104.tar.xz
$   cd linux-3.10.104
$   make menuconfig
|
配置的时候会涉及到很多内核参数,不需要的可以取消,例如Device Driver里绝大部分和一些不常用的东西都勾选掉,为了方便可以把debug info 勾选上。
$    make -j8
#    ls -la  linux-3.10.104/arch/x86_64/boot/bzImage
     lrwxrwxrwx 1 seijia seijia 22 12月 17 23:52 linux-3.10.104/arch/x86_64/boot/bzImage -> ../../x86/boot/bzImage
$    cp linux-3.10.104/arch/x86_64/boot/bzImage  ..
$   sudo apt-get install qemu
|
制作initrd
initrd吧,全称是initial ramdisk,在内核启动的时候会先去加载的一种文件系统,而这里我不太想再去搞busybox引入完整的工具包,所以直接写了一个helloworld:
/*hello.c*/
#include <stdio.h>


void main()
{
    printf("Hello World\n");
    printf("Hello World\n");
    printf("Hello World\n");
  /*强制刷新输出,不然可能打印不出来*/
    fflush(stdout);
    while(1);
}
|
然后将这个可运行程序做成文件系统:
$    cd ..
#    使用静态编译链接.
$    gcc -static -o helloworld hello.c
#    将helloworld制作成cpio
$    echo helloworld | cpio -o --format=newc > rootfs
     1776 blocks
$    ls -la rootfs
     -rw-rw-r-- 1 seijia seijia 909312 12月 21 13:15 rootfs
# 使用qemu进行启动
$    qemu-system-x86_64   \
     -kernel ./bzImage \
     -initrd ./rootfs  \
     -append "root=/dev/ram rdinit=/helloworld"
|
qemu的-kernel 和-initrd能够绕过bootload直接对指定的kernel和ramdisk进行加载.用-append进行额外的选项配置,在这里我们把根目录直接设置成内存,启动的init程序设置成放进去的helloworld.
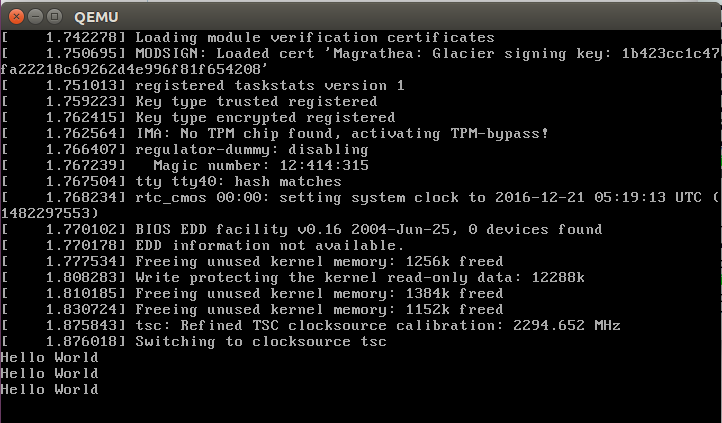
最后结果,因为while(1),启动会一直停在这里.
使用busybox
如果要使用busybox的话,则需要这样:
sudo apt-get install qemu libncurses5-dev gcc-arm-linux-gnueabi build-essential

qemu-system-x86_64 -kernel ./linux-4.9.229/arch/x86_64/boot/bzImage  -initrd ./busybox-1.30.0/rootfs.img.gz -append "root=/dev/ram init=/linuxrc" -serial file:output.txt
-kernel 指定为kernel文件的路径
-initrd 指定为文件系统路径
init=/linuxrc 内核启动后,转交给文件系统,启动的第一个程序
-serial 指定日志输出路径
|
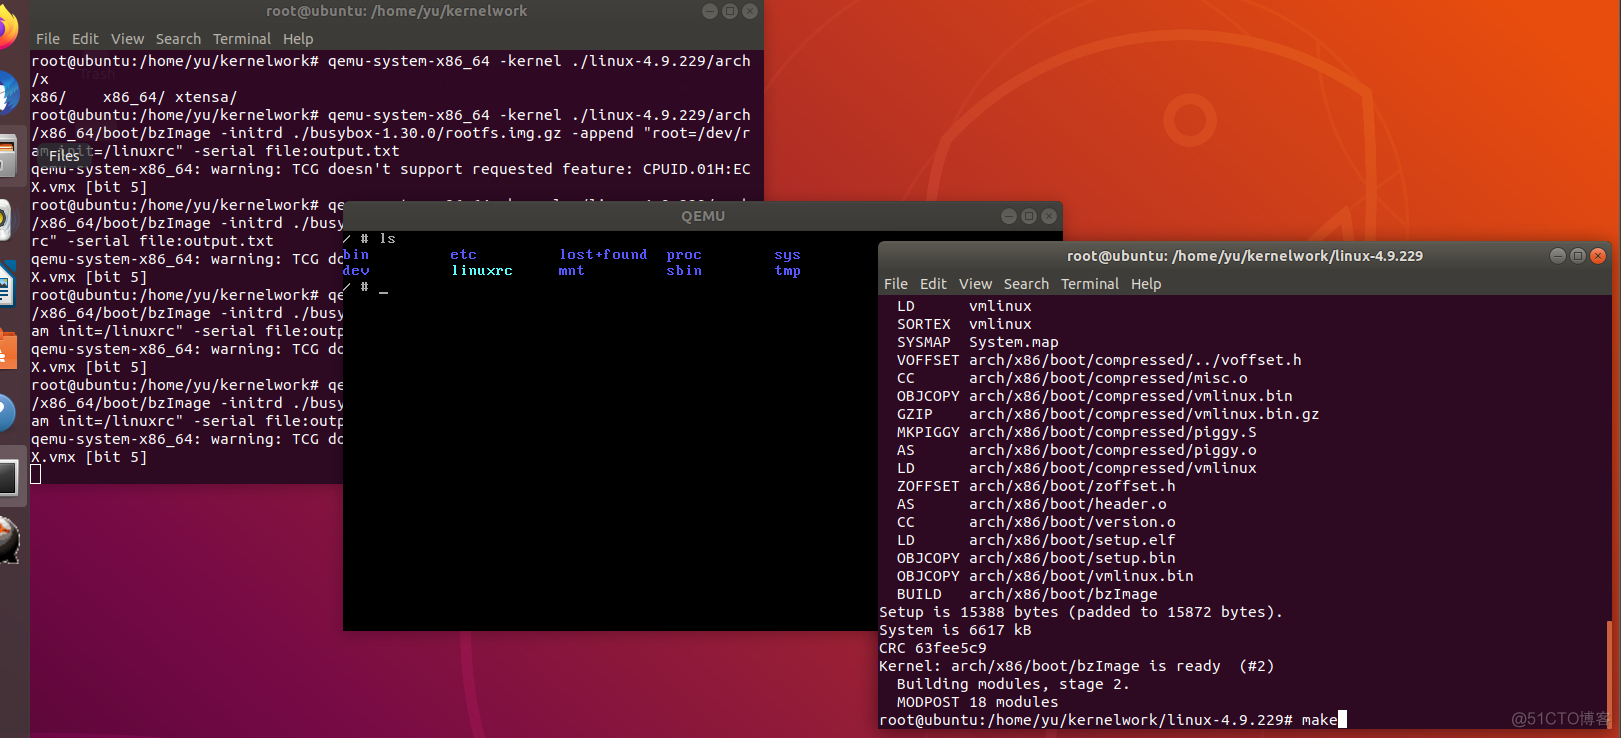
可以看到上面直接进入了bash的命令行中。
扫码手机观看或分享:
